The Electronic In and Out Board
![]()
Manual
![]()
![]()
![]()
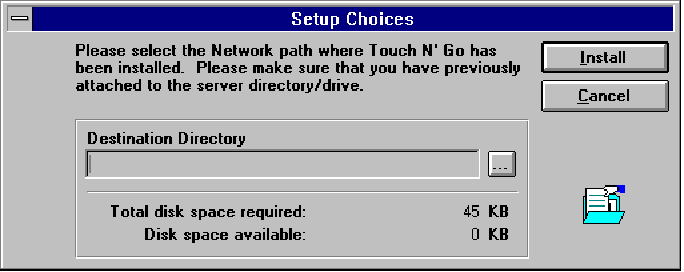
The workstation program will begin installation once the Destination Directory has been specified. Since this installation is actually a ‘pointer’ to the main program, already installed on the Server (see previous section), this workstation program needs to be told where to find the Server Program. A window like the one below will appear asking for the Destination Directory.

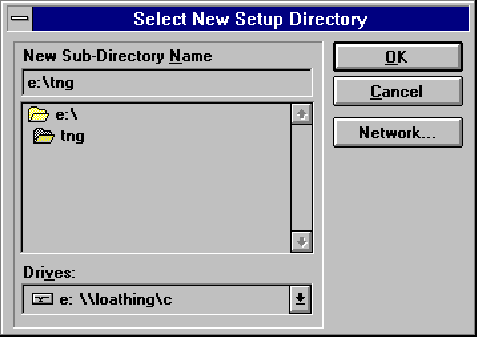
The Destination Directory will be the path (the drive and directory) to which the Server Disks were initially installed. If the Server Disks were installed to the Server’s c: drive, this drive (as the workstation can see it) will typically be named something else such as the e: drive. If you know your destination directory already, you can type the path directly into the text box provided. If you are unsure of your destination directory, double click on the ‘...’ button located next to the Destination Directory box (circled above), and browse your options. A window entitled Select New Setup Directory will appear. In this window you will want to first select the networked or shared drive (through which the server communicates). (See the following illustration.)

Scroll through the menu of available Drives by clicking on the downward pointing arrow (circled above). The network drive is often the e:\ drive.
Once you have found the correct drive, highlight the directory to which the Server Disks for Touch N' Go were installed and double click on it or press Enter. The drive and directory name you selected will appear in the New Sub-Directory Name text box. The example above shows e:\ as the Server drive and TNG as the directory. Click the OK button or press Enter when you are ready to proceed.
![]()
 |
Table of Contents | Touch N' Go | Order Form | 30 day free demo | ||||
|---|---|---|---|---|---|---|---|---|
| Next | Guest Book | Tips & Tricks |
Copyright 1995
last modified 10/4/95
All rights reserved
Touch N' Go Systems, Inc.